Wednesday, March 9, 2022

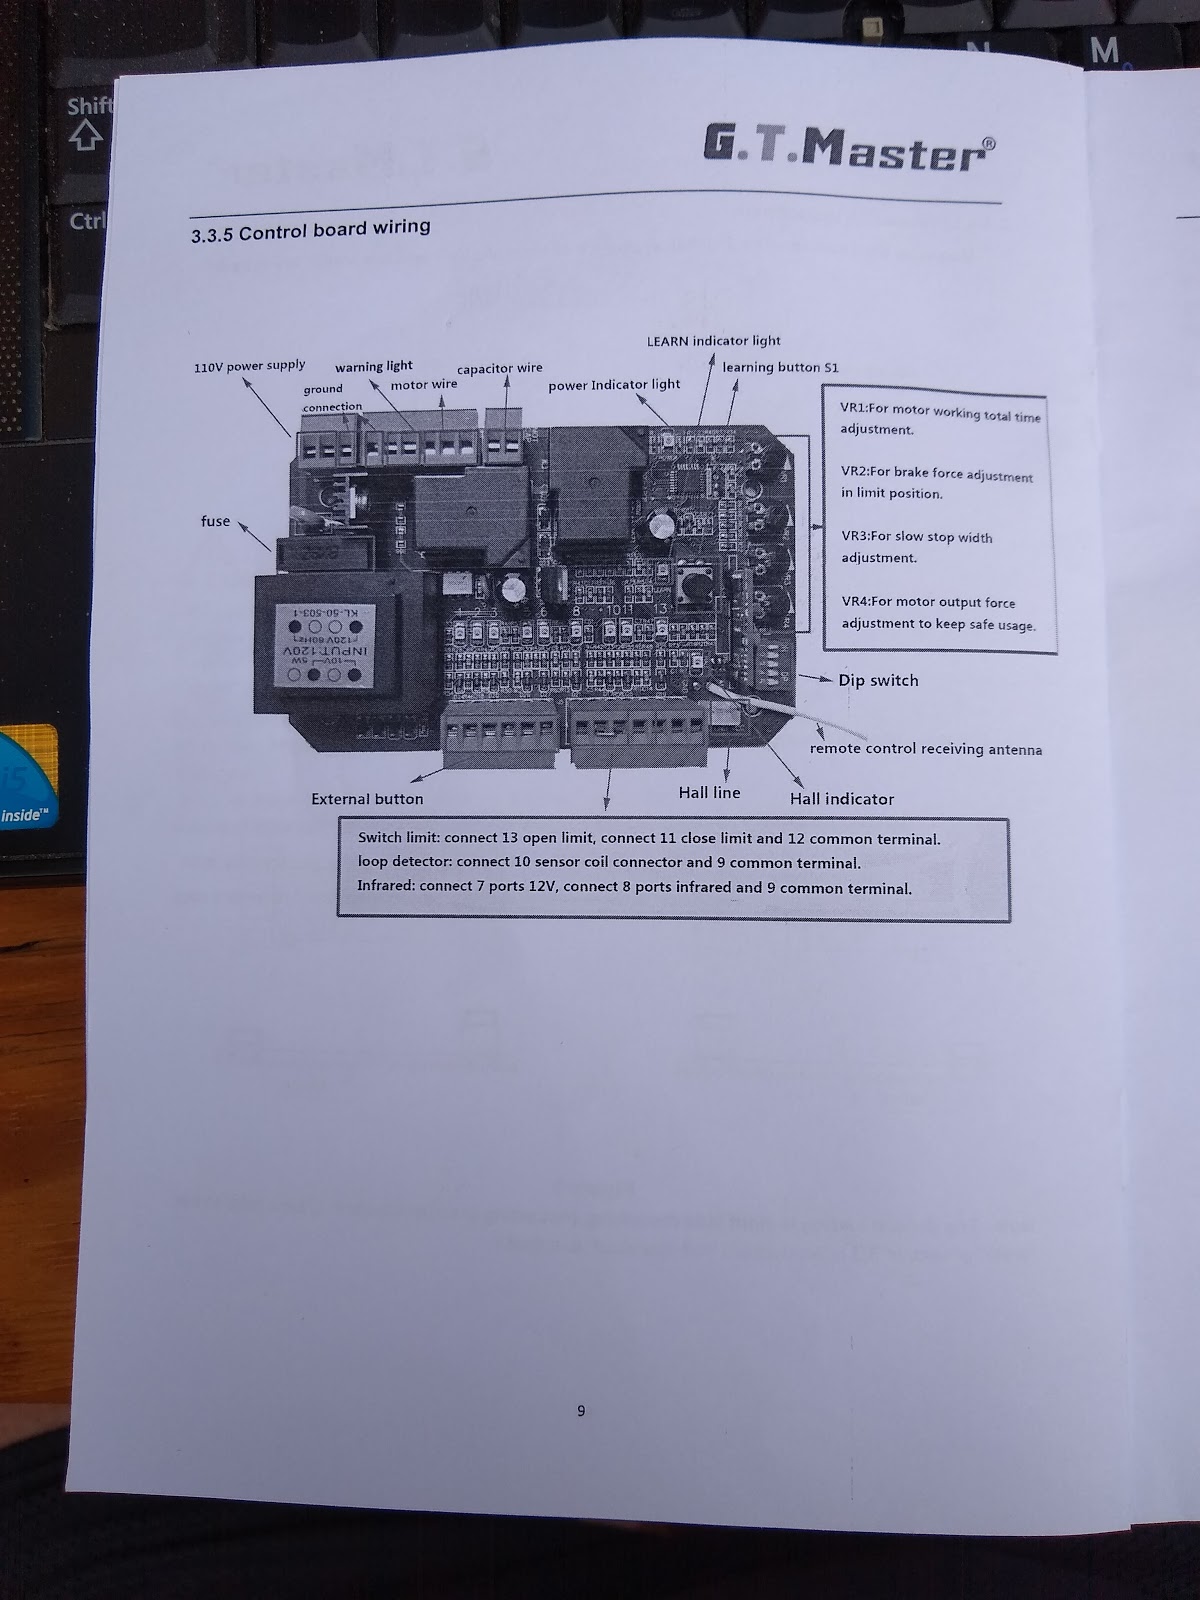
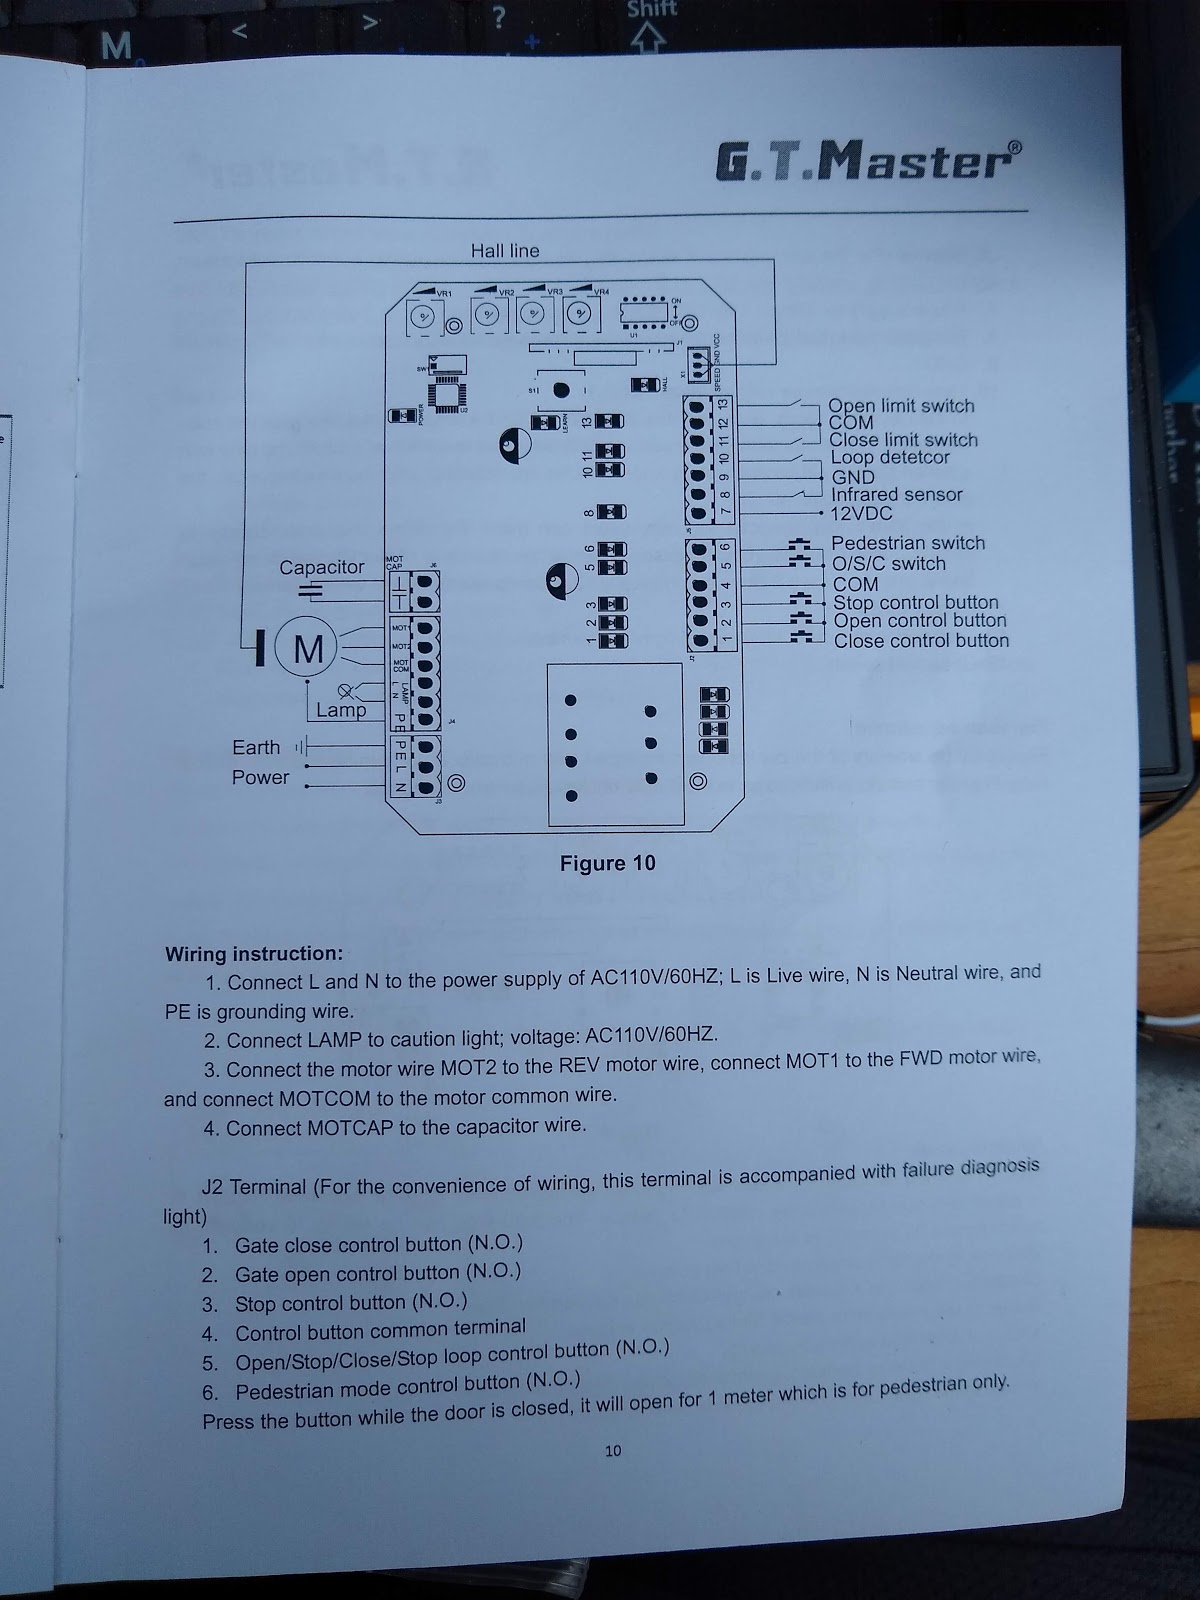
GT Master Wiring Diagram

Someone asked for the wiring diagram for the GT Master siding gate motor I use on my Roll Off Roof. Here are a couple of pages that may be helpful.

Monday, February 7, 2022

A few pictures of the upgrades

I'm not going to do much of a write up about this today, but I have a few pictures to share of the upgrades. The only thing I have shot so far is the moon, you can see the result on my Flickr account. HERE

Friday, February 4, 2022

Observatory update

I'm really not good at blogging. The observatory as been working very well for me since my last update. I am getting ready to update my mount and add additional telescope. I've removed my Orion mount and am preparting to install a EQ6-R Pro. I need to make a top plate for the pier that will support the EQ6 and I hope to do that tomorrow. Once everything is in place, I will try to do another video tour. One rig will be my observatory rig and the other will be portable.

Saturday, March 27, 2021

Houston, we have a rolling roof.

 Just a quick update.


http://bruceg333.blogspot.com/2021/04/still-under-construction-but-functional.html

Sunday, March 21, 2021

Observatory, update two

 It's been a month since my last update.  I've had a few good weather weekends and a few terrible wet ones.  But, I am making progress.  Here are a few photos of the progress.  As you can see, I have the four walls up, the posts and beams for the roll off section, including the garage door track.  I pre-wired the pier for both electrical and USB.  The roof is framed and sheathed with Solarboard.  The metal has been delivered and now I just need some time to cut and install it.  Then I need some extra hands to lift it in place.  Once it's up there, I can build the "sled" for the roof and but the rollers in the track.  When that is complete, I'll install the siding and build a door.  Then it's just trimwork and paint.  Clear Skys.

Test fitting my Sirius EQ-G mount with my Sharpstar 76.


With the floor secured, I starting making walls and running conduit for the power to the pier and for the USB cable.

Four walls are up and stormy weather is in the forecast.


After the weather cleared up, I decided to test fit my RC 6 inch as well.  Clearance will be good I think.


Back to construction, I got the beams for the roll off section put together and installed.  I forget to get a shot with the posts installed, but the post and garage track are both installed.


The roof is ready for metal.  I'm building it on the ground, then will have some help lifting it up where it goes.  Once it is in place, I'll get the rollers installed.


Sunday, February 21, 2021

Observatory constructing is underway

 If you have read any of my blog posts before, you may notice that I have a lot of hobbies.  I do and I don't apologize for it.  I wish I had time and resources to just pursue my hobbies all the time.  But alas, I don't, so I am a serial hobbyist.  Most of them don't warrant a blog post, but I decided that it was time I brushed off the ol' blog site and document this one.  

Lately, I've rediscovered my childhood love for astronomy.  And since I already have a passion for photography, I've started becoming an astrophotographer.  So after a summer and fall of hauling equipment in and out of the house every clear night I could, I decided that building an observatory would make life a lot easier on me.

It started with a hole in the ground.  I started digging into the red clay of my backyard a few weeks ago.  right before we had 10 straight days of rain.

Using these post hole diggers I was able to get down about 40 inches before it became too difficult to operate the handles unless I made the hole wider.  It's roughly 14 inches square and I didn't want to go expand it any more, so I stopped there.  Hopefully I'm far enough below the frost line here in upstate South Carolina that it won't be an issue.

The idea here was to set a concrete footing with rebar then to pour a concrete pier on top of that upon which I could attach a plate that would support my telescope tracking mount.  That plate is actually a brake drum just the right size to support my Orion Sirius EQ-G mount head.

In this photo you can see that I've already laid out the perimeter of the building.  This will be an 8 foot by 8 foot shed with a roll off roof.  The pier is placed as near to the exact center as I could manage.  The cardboard tube is a little over 8 inches in diameter and is filled with concrete, rebar and the anchors holding the break drum mounting block in place.  The building will be constructed around the pier an no part of the building will be in direct contact with it.  This is to prevent vibrations from the structure from interfering with the long exposers needed for astrophotography.

I have looked at lots of other people's observatories and there are a lot of different ways to design and build them.  I really love the dome style construction that I'm sure most people think when they hear the work observatory.  I just don't have to stills to build a dome and the professionally made domes are outside of my budget.

Here are a few more photos of where I am so far.  Floor joist are in and I've made cuts for the subfloor to leave space for the pier to be independent form the rest of the structure.  I will end up using some sort of foam sealer to file the gaps, but nothing that will transfer vibration.

This is where I am today.  I'm going to let the concrete in the pier cure for at least a week before I put any weight on it.  Right now I'm just covering it at night to keep the dew or frost off of it.
Once it has properly cured, I'll remove the form and install the floor.  When I do that I'll run some conduit from a space on the pier to carry electrical and data cables to the telescope mount.

I will have my old laptop installed in the shed and connected all the equipment, I will be able to remotely control the system from the comfort of my home.  But, all that is down the road.


Wednesday, May 25, 2016

Coming out of hibernation

It's been years since my last update, so I thought it was time to start posting again.  I'll probably start posting soon about my adventures as a new beekeeper.


That's all I have for now.

Sunday, August 18, 2013

Vertical Drum Smoker - Part 4

I took a couple of weeks off from working on my smoker to get some other work done.  I did manage to cook a small Boston butt as a test before my break.  It turned out really well, but I also learned a few things to improve upon for next time.  I don't have a custom fire basket yet, I simply put a small Weber table top grill in the bottom of the can and used it as my firebox.  It worked pretty well, but I think a basket with an ash catcher would allow for a more even flow of air and better cooking.

I resumed work on it today by putting a coat of semi-gloss black on it.  I also installed a single valve and 2 caps on the bottom vent holes.  I may replace one of the caps with another valve after a few more test burns.  It depends on how hard it is to control the temp the way it is now.  I also installed a second rack for holding a water pan, or for extra cooking space.
 I still need to paint the lid and maybe make a vent system for the top.


I may work on the improvements later.  I'm not real happy with the thermometer I bought, it seems to read about 50 degrees too hot.  I've been shopping around and reading reviews, so I'll see where that takes me. 

I may put some pipe elbows on the two side vents and place valves closer to the top.  I've seen other design with this configuration, but I'm not sure it's worth the effort.  It's not like it's hard to bend down and adjust the valve at ground level.  I'm still considering custom paint options as well.  Hopefully the 3 coats I have on it now will keep it protected from rust, but I may spice it up a little bit.

Monday, July 29, 2013

Vertical Drum Smoker - Part 3

I finished up the sanding tonight and applied one coat of Rust-Oleum High Heat Flat Black paint.  This is just a bottom coat to protect the metal I've been sanding.  It took an entire 15 oz. can to cover the sides of the drum and part of the bottom.  I'll pick up another can to finish the bottom and to do any touch up work with.  I have to strip and paint the lid as well.  I also picked up a can of dark blue engine enamel today and the auto parts store.  I plan to use it for my top coat.


Here is a photo with most of the paint gone, I did a little more clean up work before I wiped the whole think down with alcohol to prepare it for the paint.
 
Flat black High Heat paint on the sides.  The top is still original.
Not very pretty here, but it was important to burn away and sand off any of the original paint before I use it for cooking.  As you can see, I haven't done the lid yet, but it will get done too.


Vertical Drum Smoker - Part 2

Sunday turned into a short day for working on my smoker.  Most of my day was committed to doing other things and I only had a small window to work on my drum.  That window was interrupted by a sudden thunderstorm making for an even shorter day than planned.

It started the day looking like this.  One of my kids asked me why I couldn't leave it green, but the paint it came with cannot stand even the relatively low heat of smoking.

Note, I removed this photo from my Google+ account.

The black color is from the burn to start removing paint before I did any sanding.  The silver is the bare metal after a bit of sanding..  I did manage to get it about 95% sanded down to the metal, but I still need to clean up the edges, dints, etc.  It took about two hours of work over Saturday and Sunday to get the whole drum looking like the middle section pictured above.  The bottom and lid still need to be worked on.

I'm still trying to decide what type of paint job to give it once I get cleaned up and a base coat applied.  Right now I'm toward a TARDIS style paint job.  Assuming I can find the paint colors I need.

Saturday, July 27, 2013

Vertical Drum Smoker - Part 1

I've been wanting a meat smoker for a while now but the really nice ones I like are a lot more expensive that I want to spend.  I noticed a quite a few DIY smokers on a number of websites.  I considered a several different designs, but finally chose to build a Vertical Drum Smoker.  It is also called a Ugly Drum Smoker, or UDS.  I'm not going to call my an Ugly Drum Smoker because my wife told me it can't be ugly if I want to keep it in our back yard.  So, I hope I can make it look pretty nice.
Here is the first photo of the drum I bough yesterday.  I wish I had been a little more careful picking out on with fewer dents, but this will do.  This one originally contained apple juice concentrate.

Note, I removed the photos because there were stored on Google+ and I'm still evaluating their recent changes to the terms of service.


Here it is with an electric hot plate smoking a few apple wood chips on a cast iron skillet.  I'm toying with the idea of making this one run on either charcoal or with an electric element.  I'm not sure if I'll be able to reach 225 degrees with this electric hotplate.  I'll have to test it again later.

I've started removing the paint and sanding the exterior so I can give it a fresh coat of heat resistant paint.  I was going to take another photo, but I ran out of daylight.

Tomorrow I hope to finish sanding and if I'm lucky, I'll get a coat of paint on it..

Wednesday, October 3, 2012

New (used) Enlarger For My Darkroom

OmegaD5XLEnlarger_a by Bruce Garner
OmegaD5XLEnlarger_a, a photo by Bruce Garner on Flickr.

I currently have a very tiny dark room and two enlargers that I have to swap in and out depending on if I'm printing from 35mm or from Medium format.  I'm missing key accessories from each enlarger to allow me to only use one.  When I started getting interested in large format, I decided to look for a single enlarger that will do 35mm, Medium and Large formats.  And it had to be a common enough model that parts and accessories could still be found.  I decided to look for either a Beselar M45 or an Omega D model.  What I found was this Omega D5 XL.  It's currently in a friend's garage in Knoxville where I found it on Craig's List, but I hope to bring it home soon.

I started tearing out the counter top in my darkroom (which is really just the back corner of my bedroom closet) to make room for this beast.  It is a monster.  I hope to have some photos up soon of it in it's new home.

Wednesday, September 12, 2012

Speed Graphic

IMG_8961.jpg by Bruce Garner
IMG_8961.jpg, a photo by Bruce Garner on Flickr.


I believe this is an Anniversary Speed Graphic. This belongs to a friend of mine. He's a photojournalists with over 20 years experience, but he's never shot this one. He bought it off a veteran that used this in the pacific theater during WW2. This camera has literally been to war. I've given it a light cleaning to make it easier to use, but I'm reluctant to do too much to it. The battle scares give it character.

Tuesday, September 11, 2012

Stitched 4x5

Stitched 4x5 by Bruce Garner
Stitched 4x5, a photo by Bruce Garner on Flickr.
First portrait shot using the borrowed Speed Graphic. The 137mm lens is crazy wide and the ground glass is sort of difficult to frame with. The combination of those two facts explains how miss-framed the paper backdrop.


This one was an experiment. The Speed Graphic I'm borrowing doesn't have a X-sync port on the shutter. So what I did was set the F-stop to 11 and the shutter speed to bulb. I opened the shutter with a cable release in my right hand then tripped my Alien Bee with a Cactus V4 in my left hand, then released the shutter. The Alien Bee is in a small octabox above and left.
This is a 4x5 negative, but my V500 only has a scan window of about 3 1/4" wide. So I scanned it in 2 pieces and stitched it together.
Arista EDU Ultra 4x5 film
Diafine developer (3+3)

I'm developing in trays since I don't have any hangers or daylight tanks for 4x5. I can't even use taco development because my JoBo is too short.

Wednesday, August 15, 2012

Dark

Dark by Bruce Garner
Dark, a photo by Bruce Garner on Flickr.

I shot this of our friend Lauren the other night when she was over visiting my daughters.  I had gotten stagnant in my portrait shooting and  wanted to do something different from my normal style.  I was tired of the overly posed corporate head shot type photo.  I also wanted more contrast since my recent prints in the darkroom were very grey. I felt that her blonde hair would contrast nicely with a black background.  She gave me exactly the expression I wanted.

Thursday, March 1, 2012

Lots going on

This post is going to make it sound like I'm made of money, but I'm not really.  It's just that I have several little projects going on at the same time.  I've been putting back a little cash, plus it's tax return season so it going to look like I'm spending more than I am.

First of all, I've ordered some new developers.  I've been using mostly Kodak HC-110 and a little Kodak D-76.  I had just about given up on the D-76 since I have to mix it up a gallon at a time and it starts going bad as soon as you mix it.  I like the HC-110 because of how easy it is to mix up for single roll use.  Sticking with that same idea I ordered some Adox Adonal, which is the same formula as the old Agfa Rodinal.  It's a very old formula that I've been wanting to try with some stand development.  I also have some Diafine coming.  It's a very interesting developer.  It comes in an A and B solution that is largely usable at any room temperature.  It's a compensating developer and doesn't necessarily develop at box speed.  You need to expose your film with the developer in mind.  Both have something different to offer me in the darkroom and both have very long shelf lives.  I look forward to trying them out.

Speaking of trying out.  I was reading a forum post about someone using some odd film.  It turns out they were talking about Kodak SO-331 High Contrast Pan Intermediate 35mm film.  It's supposed to be used as a motion picture film, but others have been using it in SLRs.  It ships in 1000 foot rolls as opposed to the normal 100 foot rolls I usually buy.  And it was cheap,  $41 after shipping.
1000' roll of film and a bulk loader.
I shot a few test frames to experiment with development in HC-110.  The results were better than I expected, but I don't have the exposure and development times nailed down yet.  I can't wait to try it out with the new developers I have coming.

Speaking of things I have coming.  The legs on the cheap tripod I bought a few years ago finally starting turning to mush.  The ballhead is still is good shape, so I ordered a new set of legs.  I should have a set of Manfrotto 294 legs here on Friday.  I'm also just about ready to order the new (old) film body I've been wanting, a Nikon FM2n.  I'll talk more about that later.